Thursday, June 26, 2014

Scala - Brief overview and getting started

Introduction

Scala has been around for quite some time now, matured into a strong platform with its own ecosystem involving Typesafe, PlayFramework,Akka IO library and slowly becoming the defacto standard to new breed of reactive applications aligning closely with the reactive manifesto.

There are numerous posts, tutorials. documentation on Scala available on the internet and since it aligns closely to Java syntactically its easy to get started, as I dive into Scala I will attempt post core concepts, fundamentals.  

Scala documentation and references are nicely summarized at this link. The ScalaReference document is a good one as well and finally the Scala cheatsheet.

Scala Overview

The Scala language created by Martin Odersky and others at EPFL(École Polytechnique Fédérale de Lausanne) is an Object Oriented and Functional programming language which unifies best of both worlds, Scala is pure Object Oriented Language in which every value is encapsulated by an Object, the types and behavior of the Object is described by declaring a Class. Scala is a functional language in which every value is a function. Scala is a statically typed language that runs on the JVM and seamlessly integrates with Java.
Scala syntax is pretty much similar to Java yet it differs in a few way namely:-
  • Scala is a line-oriented language where statements may be terminated by semicolons or newlines. Scala does not require semicolons; at the end of a statement and are optional.
  •  Scala uses NAME: TYPE syntax for definitions and parameters, while java uses TYPE NAME for declaring member variables or arguments to methods.
  • Scala function definitions start with the def keyword, while in Java we can create methods via the <access modifier> <return type> <name> <arguments> syntax.
  • Scala uses unit for void return types.
  • Scala uses most of Java’s control constructs except for the Java traditional for loop, which it replaces by an enhanced for loop.
  • Comments are same as in Java.
Everything in Scala is an Object, unlike Java there is no concept of Primitive types, and everything in Scala is an Object even functions are Objects.

Numbers are Objects:
Example: 2 + 2 * 3 (These are all Objects being manipulated + and * are methods calls on Integer types)

Functions are Objects:
Example: def doSomeAction(time: Double) {while (true){ callSomeFunction(time)}}

Scala Identifiers

Scala Identifiers/variable names can be of the following types:
  • Alphanumeric Identifiers can start with a letter or an underscore and then be followed by arbitrary sequence of letters, digits and underscore character.  Scala follows Java’s convention of camel-case identifiers.  

          Example: someIdentifierName, a , a_, _a, ab_123 etc… 
  • Operator Identifiers consist of one or more operator characters. These are generally use to exp

           Example: + ++ ::: <?> :> ->  
  • Mixed Identifiers consist of alphanumeric identifier followed by an underscore character and an operator identifier. 

          Example: somevar_=  , this defined an assignment operator.
  • A literal identifier is an arbitrary string enclosed in back quotes (`   `).

          Example: `Y` `<someInit>` `stop`

The following names are reserved words in Scala:
abstract
case
catch
class
def
do
else
extends
false
final
finally
for
forSome
if
implicit
import
lazy
match
new
null
object
override
package
private
protected
return
sealed
super
this
throw
trait
try
true
type
val
var
while
with
yield
_
:
=
=>
<-
<:
<%
>:
#
@


Scala Literal Types

Scala Literal types are similar to Java Wrapper classes as there are no primitives in Scala, valid literal types in Scala are:
scala.Double
scala.Float
scala.Long
scala.Int
scala.Short
scala.Byte
scala.Boolean
scala.Char
scala.Unit which represents a void type
scala.Null which represents a null reference
scala.Nothing which represents an empty type

Scala Operator

The following are operators supported in Scala with similar meaning to the operators in Java.
|
^
&
< 
> 
=
!
:
+
*
/
%

Operators are usually left-associative, i.e. a + b + c is interpreted as (a + b) + c. The only exception to that rule is operators ending in a colon which are right- associative i.e. a :: b :: c is interpreted as a :: (b :: c). Right operators also behave differently with respect to method lookup, normal operators take their left operand as receiver, right-associative operators take their right operand as receiver i.e. List consing/concatenation sequence a :: b :: c is treated as equivalent to a.::(b).::(c).

Scala Classes

Every class in scala inherits from the scala.Any class. There are two sub-classes that derive from the scala.Any class i.e. scala.AnyVal subclass for values classes (i.e. most of the Scala Literal types Double, Float, Int, etc.) and the scala.AnyRef subclass for all reference type classes (i.e. Object, Sequences ).
Scala automatically generates setters and getter methods for variable definitions in a class.
Example:
var x: Int
def x: Int
dex x_ = (x1: Int): unit

Scala has a notion of primary constructor and secondary (auxiliary constructor). 

Primary constructor is the class’s body and parameters list come right after the class name

Example:
class Account(id: Long, startBalance: Double){
….
}

Secondary (Auxiliary) Constructors  are created by defining methods named “this” within the class body there can be as many auxiliary constructors as need but there is a catch, the auxiliary constructor must call the auxiliary constructor defined before it or the primary constructor. Auxiliary constructors end up invoking the primary constructor directly or indirectly.

Example:
class Account(id: Long, startBalance: Double){
     var interestRate: Float = 0
     def this(id: Long, startBalance: Double, interestRate: Float){
  this(id, startBalance)
  this.interestRate = interestRate
     }
}

Scala var and val

var is used for variables in Java terms these are of non-final types and are mutable.
val  is used for constants in Java terms these are of final types and are immutable.

Scala Class definition:


Scala Functions:

Scala functions are similar to methods in Java and following the following definition semantics.


With some very basic understanding let us get into writing some Scala, which is the only way to learn any new language - writing code.

Details on download and installation of Scala can be found on the Scala site ,

Scala Interpreter 
The quickest  way to get started with Scala is by using the Scala interpreter or Scala REPL (Read Evaluate Print Loop) which  is an interactive shell for writing Scala expressions and programs, Simply type expression into the interpreter and  it will evaluate and print results. This is not only a quick and dirty way for testing simple expression but also can be used to run Scala scripts and Scala applications.


The :help command will list available options for the Scala REPL:- :type, :reset, :replay, :cp, :imports and :quit being some of the useful ones.


When you type expressions on the REPL the REPL will print the Result: Type = Value.


Lets define a simple function to check if number is odd or even and execute it in the Scala REPL.

Typing :reset will clear all definitions.


Lets look at the for each and for loop in Scala, first we define an Array of  String elements and then execute if with concise for loops.

Scala Projects 

The scala REPL is good for quick expressions and executing scala scripts, however to write, debug scala application we need something more this is where the ScalaIDE comes useful. Scala IDE can be installed as an eclipse plugin or can be be as standalone IDE.

Details on installing the ScalaIDE plugin can be found on the Scala IDE site

Scala Project Using SBT:

SBT (Scala Build Tool) is the preferred way to run and build Scala applications and modules, unfortunately there is no simple mechanism to get started with an empty blank project similar to maven archetypes. There are other alternatives like giter8 or similar github projects which are individual efforts to make things simpler but not the real thing, I wish sbt had a simple init command which could create an empty blank Scala project Googling around found this post which looks like a viable option.

General steps in getting started with SBT Scala Project :
  1. Install and configure SBT referring to the SBT documentation.
  2. Create the base project directory, example: SimpleScala
  3. Navigate to the project directory and start sbt 
  4. Update the project name via the set name :="SimpleScala" command
  5. Update the Scala version via the set scalaVersion :="2.11.1" command
  6. Set the project version via the set version :="1.0" command
  7. Save the session via the session save command
  8. Exit out of SBT.
  9. Create a file called plugins.sbt inside SimpleScala/project and add the following contents addSbtPlugin("com.typesafe.sbteclipse" % "sbteclipse-plugin" % "2.2.0")
  10. Execute the sbt eclipse command.
  11. Base project projects src/main src/test with java and scala folders are generated and project is ready to be imported into eclipse.


Another good post about using SBT to configure projects in Eclipse is found here.

Scala Project Using Maven:

Scala projects can also be created using the maven scala-tools archetypes, which is quite old and has not been updated lately. The maven scala archetype does get some of the initial configuration but needs pom updates, especially updating repositories and scala version and deleting some generated files manually. The preferred way would be the SBT way to work with Scala projects and alternatively add the pom.xml manually to the project.

Use the following command to create and empty maven scala project.

mvn archetype:generate -DarchetypeGroupId=org.scala-tools.archetypes -DarchetypeArtifactId=scala-archetype-simple  -DremoteRepositories=https://oss.sonatype.org/content/groups/scala-tools -DgroupId=com.malcolm.scala -DartifactId=SimpleScala -Dversion=1.0-SNAPSHOT -DinteractiveMode=false

(Please replace groupID and artifactId)


Importing the maven project into the IDE will display some errors, basically related to older version of scala compiler. 


You would need to update the pom and remove the scala test files generated under the test folder. This should pretty much give you a clean eclipse maven project. 


Gets kind of messy many pom updates and deleting generated files.

There are some limitations working with ScalaIDE in terms of the version of Scala you can use, ScalaIDE is tied to a specific version of Scala as of writing this blog the current version of ScalaIDE  is available for Scala 2.10.x and 2.11.x versions but you need to pick up the correct bundle, one can  also take a chance with the milestone release which may offer better flexibility in maintaining different versions of the Scala library.

As recommended SBT is a good choice for working with scala projects, the build.sbt lets you speciy the scala version and dependencies.


Until next time,
Malcolm


Back to Scala Thoughts

Monday, June 23, 2014

Spring Data - JPA

Spring-Data project makes it easier to use data access technologies be it relational databases, NoSQL non-relational databases or other data services.  Spring-Data contains many sub-projects that are specific to a given data access technology, we will primarily look at spring Data JPA technology, which makes it easier to access JPA implementations.

Spring Data JPA project makes it easy to easily implement JPA based repositories. Using Spring Data JAP generally involves declaring repository interfaces which can include custom finder methods and leave it to Spring Data JPA to generate implementation automatically.

Core Interfaces:

Repository:
Repository is the central core interface when it comes to using Spring Data; not to be confused with the Repository annotation which has been in spring 2.0, The Repository interface is marker interface which captures the domain type to manage as well as the domain type's id type.

CRUDRepository:
The CRUDRepository interface extends the Repository interface and provides CRUD (Create Read Update and Delete) functionalities for the managed entity object. The CRUDRepository provides the following functionality:
  • Save - Saves and returns the entity which can be used further operations
  • findOne – Finds and returns an entity by its primary id
  • findAll – Returns list of all entities of the type
  • exists – Checks and returns boolean value for existence of the entity by  primary key        
  • count – Returns the count of number on entities available
  • delete – Deletes the entity
  • deleteAll – Deletes all the entities managed by the repository.

PagingAndSortingRepository:
The PagingAndSortingRepository extends the CRUDRepository and provides functionality for pagination and sorting.

JpaRepository:

The JPARepository extends the PagingAndSortingRepository to provide JPA specific extensions for the repository, Additional attributes to gain more detailed control over the setup of the repositories specifying EntityManager and TransactionManager references can be done via xml of through spring configuration object. 

Query Methods

Standard CRUD functionality usually has queries on the underlying data store and generally these may be mapped SQL statements or named queries, but with Spring-Data the underlying query can be generated automatically by the repository. The repository proxy has two ways to derive a store-specific query from the method name. It can derive the query from the method name directly, or by using a manually defined query depending upon following the Query lookup strategies.

CREATE - Construct a query from the query method name by removing given set of well-known prefixes from the method name and parse the rest of the method.

USE_DECLARED_QUERY – Will try to find a declared query and will throw an exception in case it can't find one. The query can be defined by an annotation somewhere or declared by other means.

CREATE_IF_NOT_FOUND – This is the default strategy that combines CREATE and USE_DECLARED_QUERY. It looks up a declared query first, and if no declared query is found, it creates a custom method name-based query.

The query look up mechanism strips prefixes find…By, read…By, query…By, count…By, and get…By from the method and starts parsing the rest of it.


Please refer to the Spring-Data reference for more details on query look up styles. 


@Query

Using named query in JPA is a very valid approach for annotating model objects and then referring to the named queries in the data access object, however with this approach the entity model soon becomes cluttered with named query and the DAO classes may get hard to read since you would be going back and forth between the actual query and the DAO class where it is used.  


The Spring-Data @Query annotation makes is very simple to annotate queries in the repository interface and use them in the repository itself, native queries easily supported by marking nativeQuery attribute as true. Named query parameters are also easily supported. 

Please refer to the Spring-Data reference for more details on @Query examples. 

Spring Data JPA Implementation:

Please refer to previous post if you plan to import the test project onto local machine and run code locally. 

Annotated Model Object: 
The com.malcolm.daotest.hibernate.model package contains JPA annotated model, which is pretty straight forward. We annotate each Java object with the @Entity,  @Table and @Column annotation at minimum. JPA annotations are found in the javax.persistence.* package.  Please refer here for declaring Object Relational Mapping in the POJO beans. 

Spring Data JPA Repository: 


The com.malcolm.daotest.hibernate.dao.spingdatajpaimpl.EmployeeInfoRepository is the JPA repository for the the Spring Data JPA implementation. The interface extends JpaRepository for Employee type and defines @Query methods. The reason we use  explicit @Query with JOIN FETCH strategy is to minimize n+1 issue with multiple calls to the database, we still have a issue since there are multiple collection based relationships and n+1 issue occurs, if we try to put a JOIN FETCH strategy for all collections we will get a Cartesian product.  


Spring Data JPA DAO Implementation: 

The com.malcolm.daotest.hibernate.dao.spingdatajpaimpl.EmployeeDAOHibernateSpringDataJPAImpl class provides Spring Data JPA implementation via the EmployeeInfoRepository.


Spring Data JPA Configuration: 

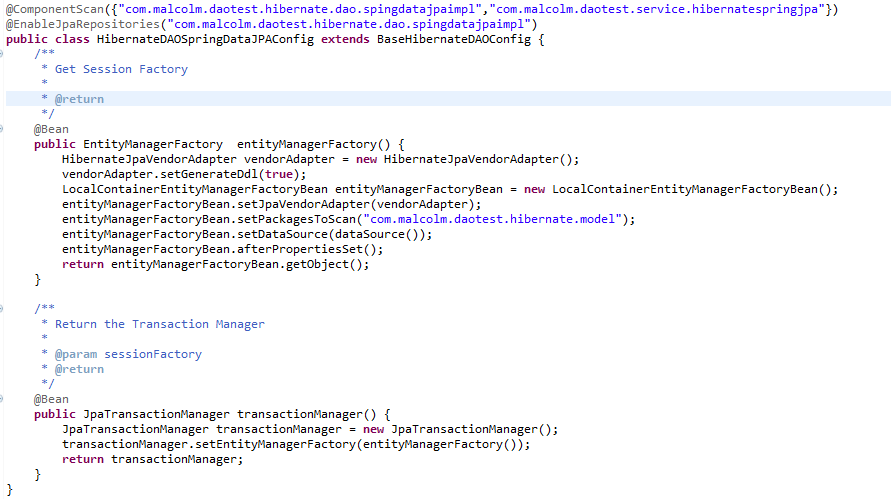
The com.malcolm.daotest.hibernate.HibernateDAOSpringDataJPAConfig sets up the required bean dependency setting the EntityManager and TransactionManager, the datasource and hibernate properties are configured in the BaseHibernateDAOConfig.

The DAO uses the @EnableJpaRepositories to scan packages of the annotated configuration class for Spring Data repositories and @ComponentScan annotations to clearly mark the annotated models and Service Components.


Spring Data Implementation Design: 


Strengths:
  1. Very flexible and concise approach of integrating with data services.  
  2. Smart findByxx methods that can be easily used without much coding. 
Weakness:
  1. The weakness will depend on the underlying data services, Spring Data JPA provides a concise wrapper for JPA data services.  
Please refer to Spring Data Reference for further details.  

Back to previous post on Object Relational Mapping.

Until next time,
Malcolm


Sunday, June 22, 2014

Hibernate Object Relational Mapping

Continuing from the post on Object Relational Mapping let us look at Hibernate Object Relational mapping implementation.


Hibernate ORM is an Object Relational Mapping framework for persisting Java objects to a Relational Database System. Hibernate provides a native API (SessionFactory, Criteria API and Hibernate configuration files), and also fully implements JPA (Java Persistent API) specifications which is the more preferred way on integrating with Hibernate ORM framework.   

General architecture of Hibernate is depicted in the following diagram:


SessionFactory : Contains Thread safe cache of compiled object relational mappings for a single database.

Session: Single threaded short lived object that is used by applications to access persistent store.  

Persistent Objects: Single threaded Short-lived objects containing persistent state and business function which are a associated with exactly one Session. 

Transaction : Single threaded, short-lived object specifying atomic units of work.

TransactionFactory: A factory for creating Transaction instances, this is used indirectly by application for managing transactions

Application creates persistent objects, these objects may be annotated using JPA entity annotations or may be POJO (Plain Old Java Objects) with explicit hibernate mapping xml files. Application then obtains SessionFactory to perform CRUD based operations on the relational database using hibernate Session. 

Please refer to Hibernate documentation for more details.


Hibernate Tools Project

Hibernate tools project is a good way to get started in generating base components and pojo mappings for relational database entity model. Hibernate tools can be easily integrated into eclipse via eclipse market place.  

One of feature of hibernate tools is its reverse engineering capabilities to generate domain model classes, mapping files, annotated entity beans very quickly to get started with Hibernate ORM, it reads database constructs and generates basic CRUD entities, however it may generate more stuff than you want or may not generate entity fields that you would expect. 

Hibernate tools does provide a mechanism for specifying table entries and columns via the reveng.xml mapping file where one can control basic features, however for more complex mapping strategies one would have to extend org.hibernate.cfg.reveng.DelegatingReverseEngineeringStrategy and implement custom reverse engineering strategy. 

Further more with respect to annotations, the reverse engineered entity model will contain method level annotations on getter methods and no field level annotations, personally I feel having field level annotations is much cleaner, but to have field level annotations one must again write custom templates, all on this seems like an overkill, I would stick to annotating POJO fields manually. 

More details on Hibernate Tools and Reverse Engineering can be found at here

The feature that I like most about Hibernate Tools is the Hibernate Console Configuration, which can be quickly used to validate  and execute HQL (Hibernate Query Language) / JPQL (Java Persistent API Query Language) queries and generate mapping diagrams showing a visual representation of the Object Relational Mapping model which works well for small concise model but may be a little too overwhelming for large models. 

Hibernate Implementation:

Please refer to previous post if you plan to import the test project onto local machine and run code locally. 

Annotated Model Object: 
The com.malcolm.daotest.hibernate.model package contains JPA annotated model, which is pretty straight forward. We annotate each Java object with the @Entity,  @Table and @Column annotation at minimum. JPA annotations are found in the javax.persistence.* package.  Please refer here for declaring Object Relational Mapping in the POJO beans. 


Hibernate DAO Implementation: 
The com.malcolm.daotest.hibernate.dao.hibernateimpl.EmployeeDAOHibernateImpl class provides a native hibernate implementation via the Hibernate SessionFactory and Criteria API, I should say its more like semi native, since we are not using Hibernate Mapping Files (*.hbm.xml) containing POJO Relational Database System mapping but rather using JPA annotated beans.

The EmployeeDAOHibernateImpl has autowired SessionFactory and @Repository annotation marking it as a DAO class for encapsulating storage, retrieval, and search behavior.


Hibernate Configuration:

The com.malcolm.daotest.hibernate.HibernateDAOConfig sets up the required bean dependency setting the SessionFactory and TransactionManager, the datasource and hibernate properties are configured in the BaseHibernateDAOConfig.


Hibernate JPA DAO Implementation: 

Using JPA is the preferred way of integrating Object Relational Mapping with Hibernate which fully implements JPA2.1 in Hibernate 4.3.5.
The com.malcolm.daotest.hibernate.dao.hibernateimpl.EmployeeDAOHibernateJPAImpl class provides JPA implementation via the EntityManager, Join Fetch strategy is used to avoid the hibernate N+1 problem.


Note: Even though we have specified a JOIN FETCH strategy to eliminate n+1 issue with multiple calls to the database, we will still have a issue if there are multiple collection based relationships and n+1 issue will occur, if we try to put a JOIN FETCH strategy for all collections we will get a Cartesian product. The only way to control such an issue is to use appropriate LAZY and EAGER load strategy of collection objects.

In the test project the Employee entity object has two relation based collections, employee roles and employee project associations, I was not successful to eliminate the n+1 issue for getting employee roles.

Hibernate JPA Configuration:

The com.malcolm.daotest.hibernate.HibernateDAOJPAConfig sets up the required bean dependency setting the EntityManager and TransactionManager, the datasource and hibernate properties are configured in the BaseHibernateDAOConfig.

The DAO uses the @ComponentScan annotations to clearly mark the DAO and Service Components


Hibernate Implementation Design:


Hibernate Tools Console Configuration:

As mentioned earlier, the Hibernate tools eclipse plugin is very useful to quick check HQL/JPQL queries. First set up Hibernate Console Configuration by providing, project, database connection and hibernate configuration file.


Opening the HQL Editor quickly allows to validate HQL queries.


Strengths:
  1. No JDBC boiler plate code. 
  2. Supports paginations, connection pooling and caching mechanisms.  
  3. Hibernate uses dialect classes for underlying databases so can work across multiple databases. selecting the right.
  4. Hibernate easily supports relationships like One-to-One, Many-to-One, Many-to-Many.
  5. Support Lazy and Eager strategies for loading relationship
  6. Hibernate can generate primary keys with different generation strategies;
  7. Fully supports JPA implementation.
Weakness:
  1. Can encounter N+1 issues where multiple SQL queries are fired to fetch relational data elements.
  2. Appropriate Lazy and Eager strategies must be evaluated to avoid n+1 issues.
  3. Fetch Join strategies must be evaluated carefully for cartesian products.
  4. Need to be proficient with HQL (Hibernate Query Language) / JPQL (JPA Query Language).
  5. No much control in fine tuning queries generated with Hibernate at runtime, may be forced to use Native Queries to address performance issues. 
Please refer to Hibernate Reference for further details.  

Back to previous post on Object Relational Mapping.

Until next time,
Malcolm

Back to Java Thoughts

Friday, June 13, 2014

MyBatis SQL Data Mapping

Continuing from the previous post on Object Relational Mapping let us look at MyBatis SQL Data Mapper framework implementation.

The following are prerequisites if you plan to import the test project onto local machine and run code locally:
1. MySQL Database (Entity model and database schema is explained in the previous post)
2. Java 1.7
3. Eclipse (Java EE Editor Kepler)
4. Eclipse Plugins
        - Git
        - Maven
        - Gradle (Optional for gradle lovers)
        - MyBatis Generator

MyBatis is the successor to the open source Apache IBatis project started by Clinton Begin in 2002. MyBatis is a data mapper framework that abstracts boiler plate JDBC code with simplistic SQL Mapping to the persistence layer. 

The core components in MyBatis are:
  1. XML Configuration files (yep xml still alive and kicking) but again xml configuration is optional , configuration can be done use java annotations as well.
  2. XML Mapper files where the Object Relational Mapping or more strictly SQL Data Mapping occurs. These mapper files contain named mapped statements with SQL.
  3. SqlSessionFactory, which opens up a database connection and provides the SqlSession core component which performs SQL Data Mapping, executing SQL on RDBMS and object mappings based on xml mapper configurations. Every MyBatis application centers on the SqlSessionFactory. 
That it, that’s what MyBatis application generally involve. More details on each of the components can be found on MyBatis Reference Documentation which is quite lean and neat.

MyBatis Overview (This Image comes from the Google Code MyBatis Site)

Image from Google Code MyBatis Site

The general steps in writing a MyBatis SQL Data Mapper Implementation involve:
  1. Creating xml configurations file yep (mybatis-config.xml). This xml file will include settings for the dataSource connection details, any transaction manager, properties, mappers – which point to the SQL Mapper configuration files.
  2. Creating the SQL Mapper Configuration files containing the SQL Data Mapping and mapped statements
  3. Classes that use SQLSessionFactoryBuilder to retrieve instance of the SqlSessionFactory and acquire the SqlSession to execute mapped statements and queries.  
This looks pretty straightforward on paper but involves lots of typing to get the initial configuration correct, and may take a few iterations to get it right. Thankfully there are many side projects on the MyBatis ecosystem and MyBatis Generator is one such project that saves the day, making initial set up quick and simple.

Let start by first importing the project into eclipse workspace and then review each of the core modules that facilitates SQL Data Mapping using MyBatis.


Clone git repository and import test project:

The test project - com.malcolm.daotest is my attempt to look look at SQL Data Mapping and Hibernate ORM framework and validate ease of use and set up, strengths and weakness. The project uses Spring framework to bind together core components using annotations only, no xml configurations are used. Data access objects are implemented in MyBatis, Hibernate native (Session Factory and Criteria API), Hibernate JPA using Entity Manager and Spring Data JPA wrapper which uses the Hibernate JPA implementation.

The project is hosted on github so you may need to have git available on local machine to clone the project locally or if not using git you can still download the source code from github. The screen shots and code walk through uses Eclipse IDE (Kepler EE) with maven, git, gradle and mybatis generator plugins. All of these are not necessarily a requirement but eases lot of pain points during development.  

Using the eclipse git plugin import the project from github and use the following URI https://github.com/MalcolmPereira/com.malcolm.daotest.git leave rest as default and click next selecting the master branch.


Next specify a destination on your local machine where the repository will be cloned, and leave default setting and click on Next.


Next select import existing projects wizard option and import the project into the eclipse workspace by clicking on the finish button. 


If all goes well the project should be imported in the eclipse workspace with no issue.


If you are using gradle plugin and need to turn on gradle nature, right click on the project and activate gradle by selecting gradle - refresh all. 


MyBatis Generator:

Let us first examine core sections of the MyBatis generator configuration file (generatorConfig.xml), as mentioned earlier MyBatis generator aids in initial configurations to get started with sql mappers and generating the required java classes.

The following is the basic minimum setting required in the MyBatis generator configuration file.

Database Driver and Database Connection Settings:
MyBatis generator works by introspecting the database to generate required sql mappers and base model objects, so we need a database driver to connect to the database, mysql in this case. Please update the classpath entry to valid location of the mysql connector jar file. Specify required jdbc connection attributes with connection URL and database credentials.


Java Model Generator:
Java Model Generator generates the object model including primary keys. Generation of the model objects will depend on the table setting definitions described next. The target package instructs the model generator where to generate the model java objects.


Java Client Generator:
The Java Client Generator generates Java interfaces and classes that allow easy use of the generated Java model and XML map files. Generation of xml map files is controlled by type attribute which can take values - XMLMAPPER, ANNOTATEDMAPPER and MIXEDMAPPER, we are using XMLMAPPER which will generate XML map files.


SQL Map Generator:
The SQL Map Generator generates the SQL Mapper files when the client generator type is XMLMAPPER.


Table Setting:
The Table element is used to select a table in the database for introspection. Selected tables will cause the following objects to be generated for each table - SQL Map File, Java Model reflecting the columns in the database table, DAO interface class.


Please refer to MyBatis XML configuration reference for more details. 

MyBatis generator can be run from the command line or easier way by using the MyBatis Generator Eclipse plugin and right clicking on the generator config file in eclipse.


This should generate the corresponding packages and java objects.


com.malcolm.daotest.mybatis.mapper  - Mapper Interfaces:


The mapper package contains the mapper interfaces. MyBatis generator will generate definitions for basic CRUD (Create Read Update and Delete) operations.


com.malcolm.daotest.mybatis.model - Model Objects:
The model package contains the entity model created by introspecting the database and settings specified in the table attribute definitions of the MyBatis generator configuration file.


com.malcolm.daotest.mybatis.sqlmap - SQL Mapper resources:
The sqlmap resource package contains the sql named mappers that will be used to map entity object to SQL operations for the CRUD definitions  in the mapper interfaces.

Extending MyBatis Generator Components:

MyBatis generator will generate code for a typical CRUD application which should suffice for most use cases, however one drawback of MyBatis generator is that it does not generate code for relationships and does not have any way of expressing for them, for example: Employee may belong to one Department, have a Designation, play one ore more Role and be associated to zero or more Project. To express relationships via composition or aggregation we may need to update the generated model manually to include additional relationships.

Employee.java entity model object:

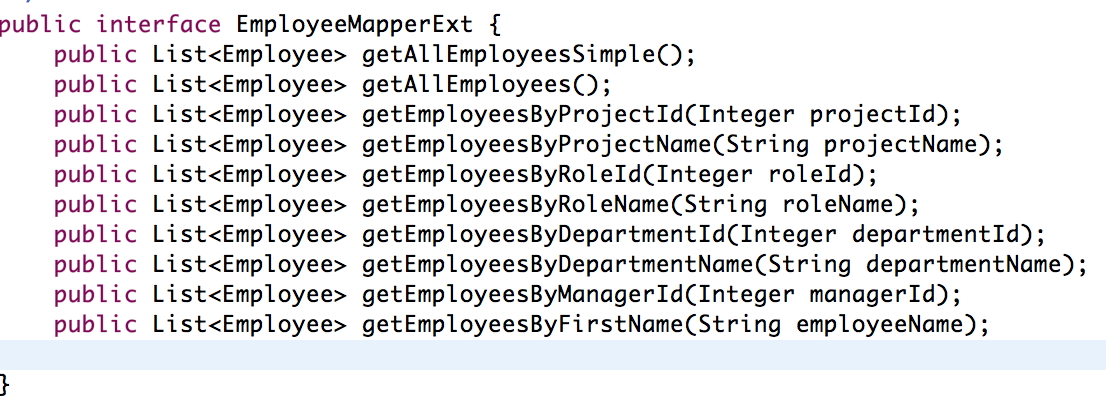
If we need extended join queries joining multiple tables, example - Employee, Department, Designation, Roles and Project, MyBatis Generator generated code will not work, in such cases better to create new mapper interface and sql mapper files which will contain the extended join queries and mappers. 

EmployeeMapperExt.java mapper interface:


EmployeeMapperExt.xml sql map:


Complex associations and collections can be used in the sql map xml files to build object relationship trees. Please check out Mapper XML file for further details.


MyBatis DAO Components:

Now that we have the model, mappers and sql map how do we translate these to valid data access object components ?. We create DAO classes by implementing the mapper interfaces and use the SqlSession object to execute named queries in the sql map files.

I am using MyBatis-Spring which offers seamless integration between MyBatis and Spring. 

BaseDAO.java: Looks up sql mapper using the SQLSession,


EmployeeDAO.java: Extends the BaseDAO and implements the mapper interfaces.


SQLSession is used is obtained via org.mybatis.spring.SqlSessionTemplate which ensures that the SqlSession is associated with running Spring transactions. In addition, SqlSessionTemplate manages the session life-cycle, including closing, committing or rolling back the session as necessary.


MyBatis Spring Configuration:


Putting it all together we use a spring configuration object which helps in defining spring beans via annotations and autowire the SQLSession.


MyBatisDAOConfig.java:


MyBatis Implementation Design:


Strengths:
  1. No JDBC boiler plate code. 
  2. Low learning curve, simple and straight forward.
  3. Works with most RDBMS and other legacy databases that support SQL.
  4. Can be easily integrated using dependency injection frameworks.
  5. Full control of SQL which can be fine-tuned to improve performance interacting with the underlying RDBMS.
  6. Supports connection pooling and caching mechanisms to further aid overall performance. 
Weakness:
  1. Pagination, no implicit support of pagination for large resultsets.
  2. Full control over sql, which means sql is tied to a specific engine, porting to another database may need tweaks to the sql (not really a weakness per say not sure how many times that will happen :)) 
  3. Can quickly get out of control as sql maps - result columns are randomly updated by developers to suite functional requirements, hard to maintain clean relational model both at object level and relational database level. 
  4. If application has full control on database schema and object model, it would be better to use a pure Object Relational Mapping framework like Hibernate / JPA.

Please refer to MyBatis reference for further details.    

Back to previous post on Object Relational Mapping.

Until next time,
Malcolm

Back to Java Thoughts